ISSUE: When aggregating records for inclusion in a geoportal, we frequently harvest just the metadata records. Unfortunately, these sometimes are missing needed technical information. Important technical metadata elements that might be missing include:
- bounding box coordinates
- coordinate system
- geometry type
- distribution format
- file size
When we harvest large collections of standalone metadata files, it might not be apparent that certain values are missing until we have already worked on the descriptive metadata values in GeoNetwork.
CHALLENGE: This type of metadata is difficult or impossible to obtain without downloading the dataset and using ArcCatalog or GDAL to extract the values. If we already have a metadata file associated with the resource, what is the best way to insert the technical metadata values?
SOLUTION: Download the dataset and use ArcCatalog to automatically generate the technical metadata. Next, use the Import Metadata tool to merge the existing metadata with the newly created metadata. Finally, re-upload the newly created metadata file to GeoNetwork, with the Overwrite option selected.
Step by Step Directions:
Part I: Generate the technical metadata
1. For each dataset, go to the distributor's website. Download the dataset and unzip.
2. Open ArcCatalog.
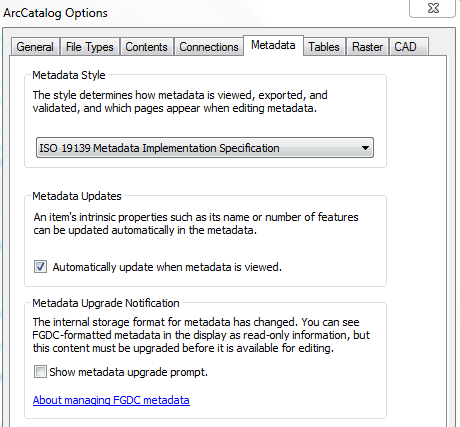
- Make sure ArcCatalog is using ISO 19139 Metadata for display. Go to Customize-ArcCatalog Options-Metadata-Metadata Style. Select ISO 19139 Metadata Implementation Specification.
3. In the Catalog Tree, click on the downloaded file (likely .shp)
4. In ArcCatalog’s main center window, click on the Description Tab
- This will generate (or update) a metadata file in the ArcGIS format that includes all of the technical information we need.
- At this point, the metadata only includes technical elements.
Part II: Obtain the existing descriptive metadata
5. Open GeoNetwork and find the record for the same dataset (use the UUID to search)
6. Open the record in View mode by clicking the title
7. Go to the Dropdown icon on the right and select “Export XML”

8. A new page with just XML should open. Download it to your desktop by right-clicking anywhere on the page and selecting “Save As.” (Depending upon your browser, you may also be able to go to the browser’s top menu and do “File-Save Page As”)
9. The Save As dialog box will pop up. Save to any place you can find again. You may want to change the name to something special to identify it.
Part III: Merge the two sets of metadata
10. Return to ArcCatalog. Open the ArcToolbox.
11. Find and open the following tool: Conversion Tools - Metadata - Import Metadata

12. The Import Metadata Dialog box will open. We need to import the downloaded metadata file into the dataset.
- Source Metadata: The XML file you just downloaded
- Import Type: FROM_ISO_19139 (should be the default!)
- Target Metadata: The shapefile itself
- Enable automatic updates- Uncheck this! (otherwise, the title won’t import)

13. Run the tool.
14. Click on the shapefile again in the Catalog Tree and go to the Description tab in the center window. You should see that the metadata has more information now- a title, a description, the link to PASDA, and other fields that you added before.
Part IV: Upload the new metadata files to GeoNetwork
15. The Import Metadata tool also imported the UUID that was generated by GeoNetwork. Therefore, the record can be re-uploaded to GeoNetwork with the Overwrite option selected. This will effectively update the record with the new technical information included.
